
Are you confused by sharpening in PhotoShop? What values should I put in for Amount, Radius and Threshold in UnSharp Mask. What do these terms mean?
Our colleague John MacLulich of Pure Colours Digital Imaging (a man of immense experience in the world of colour) has prepared an article is on how best to sharpen images in PhotoShop that explains these and many other aspects of sharpening images in PhotoShop.
This article assumes an intermediate to advanced level of Photoshop ability, but if you consider your knowledge is more basic, then please don’t be put off reading it — you will gain a better understanding of PhotoShop if you do.
He has also written an article on how to adjust images in PhotoShop in order to achieve the best possible results on uncoated paper — anything from newsprint, to bond, recycled, earthy look, and expensive premium uncoated papers. John explains how the correct use of colour profiles is the key to success here.
It is also important to point out that even if you have no intention of printing on uncoated stock, John’s article is so informative that you can’t help but learn a lot about the mysterious art of sharpening. It is a goldmine of information, with many links to enable you to take it further.
In a previous article, I outlined the process of adjusting the colour and saturation of an image for printing on uncoated paper stocks, using an appropriate colour profile. Using the correct profile is only part of the overall workflow for preparing images for print. Sharpening should also be a key part of your workflow.
Most photographers agree that sharpening is most effective when it is applied more than once during image editing. There are three stages recognised — Input Sharpening, Creative Sharpening and Output Sharpening. When preparing images for print on uncoated stocks, Output Sharpening has the greatest effect, and I will go into more details of this technique below. For completeness sake, though, I will outline all three types of sharpening.
1) Input Sharpening or Capture Sharpening
Input sharpening aims to address any blurring caused by the image source — to restore any sharpness lost as a result of the capture process. For example, digital cameras (the source of most images these days) have anti-aliasing and de-mosaicing filters which can cause blurring, and the softness of the image is very much dependent on the quality of the camera’s lens. So, most cameras apply a sharpening process automatically, before saving images as JPEG files. Apart from some camera settings such as Landscape/Portrait mode (which can affect automatic sharpening), this is pretty much out of the control of the user. If your camera is able to save files as ‘Camera Raw’ format you do have the option to save images without automatic capture sharpening and then to manually sharpen images using professional software such as Lightroom or Adobe Camera Raw. Manual input sharpening is beyond the scope of this article, but if you are interested in reading more, try this article from outdoorphotoacademy.com on understanding input sharpening
2) Creative Sharpening or Selective Sharpening
Creative sharpening is usually applied subjectively — artistic intent and image content determine its use. Sharpening might not be appropriate for a smooth sky or a baby’s skin, but extra sharpness might be suitable for foliage, crowd scenes or facial details. Creative sharpening can be used very effectively to draw attention to a photo’s subject, but can be time-consuming as this usually requires the creation of an image mask to allow the sharpening to be applied only to selected areas of an image. Photoshop has a “Smart Sharpen” filter. It comes with a range of sliders to selectively apply sharpening to shadow and highlight areas of your image, to remove artefacts introduced by blurring, and to reduce noise. If you convert your image layer to a Smart Object before applying a Smart Sharpen filter (or any other creative filters for that matter), you can adjust your image by way of non-destructive editing (meaning you can experiment with an infinite variety of sharpening and colour correction filters and not affect the original image). Some detailed tutorials about creative sharpening can be found in the video below.
and
3) Output Sharpening
Output sharpening is the process of optimising your image for the final output method (print or web). Professional software applications such as Lightroom and Adobe Creative Raw have specific functions for sharpening for output. But the process is a little more difficult for Photoshop users. There is no setting for adding sharpening as part of the print process and the user has to rely on the somewhat subjective application of Unsharp Masking (USM) or more complex techniques for sharpening (such as the use of a High-Pass Filter).
When using Photoshop, the most important thing to remember is that you must first resize your image to the final print size BEFORE applying any output sharpening.
The normally accepted standard for print reproduction of images is to resize them to 100% finished size at 300dpi. This somewhat arbitrary number harks back to the days when repro-cameras were used to prepare screened film separations of images. The most common screen ruling used then for full-colour images (and probably still is now) was 150# (150 lines per inch) — and the theory of the time said that a digital image should have at least 2x the pixel information needed to generate a rosette pattern (a colour image printed by a printing press consists of rosettes which are made up of varying amounts and densities of cyan, magenta, yellow and black ink). So a 150# screen required a 300dpi image. More modern digital image capture techniques, and far superior image interpolation algorithms, now mean that perfectly acceptable image quality in print can be achieved with far less pixel data (even as low as 1x the screen ruling), especially when using a high-quality image capture device (a professional camera or scanner).
Nevertheless, the industry still adheres to this traditional rule-of-thumb. So I strongly suggest that you resize your images for print to 100% at 300dpi so that you can apply output sharpening.
Output sharpening often requires a leap of faith, as it’s almost impossible to judge the final effect by viewing it on your computer screen. In fact, effective output sharpening often makes an on-screen image look very harsh, or contrasty. This is especially true when preparing images for print on uncoated paper, where the ink absorption is high, and the amount of sharpening needs to be greater than might be applied to images to be printed on coated paper (gloss or satin). This often results in on-screen images that are very garish.
The most common method for applying output sharpening in Photoshop is to use the contradictorily named USM (Unsharp-Mask) filter. The Unsharp Mask filter works by exaggerating areas of high contrast — i.e. edges. This gives the appearance of sharper edges, and increases the apparent overall sharpness of the image. While it can’t make a blurred or out-of-focus image sharp, it can dramatically increase the perception of sharpness.
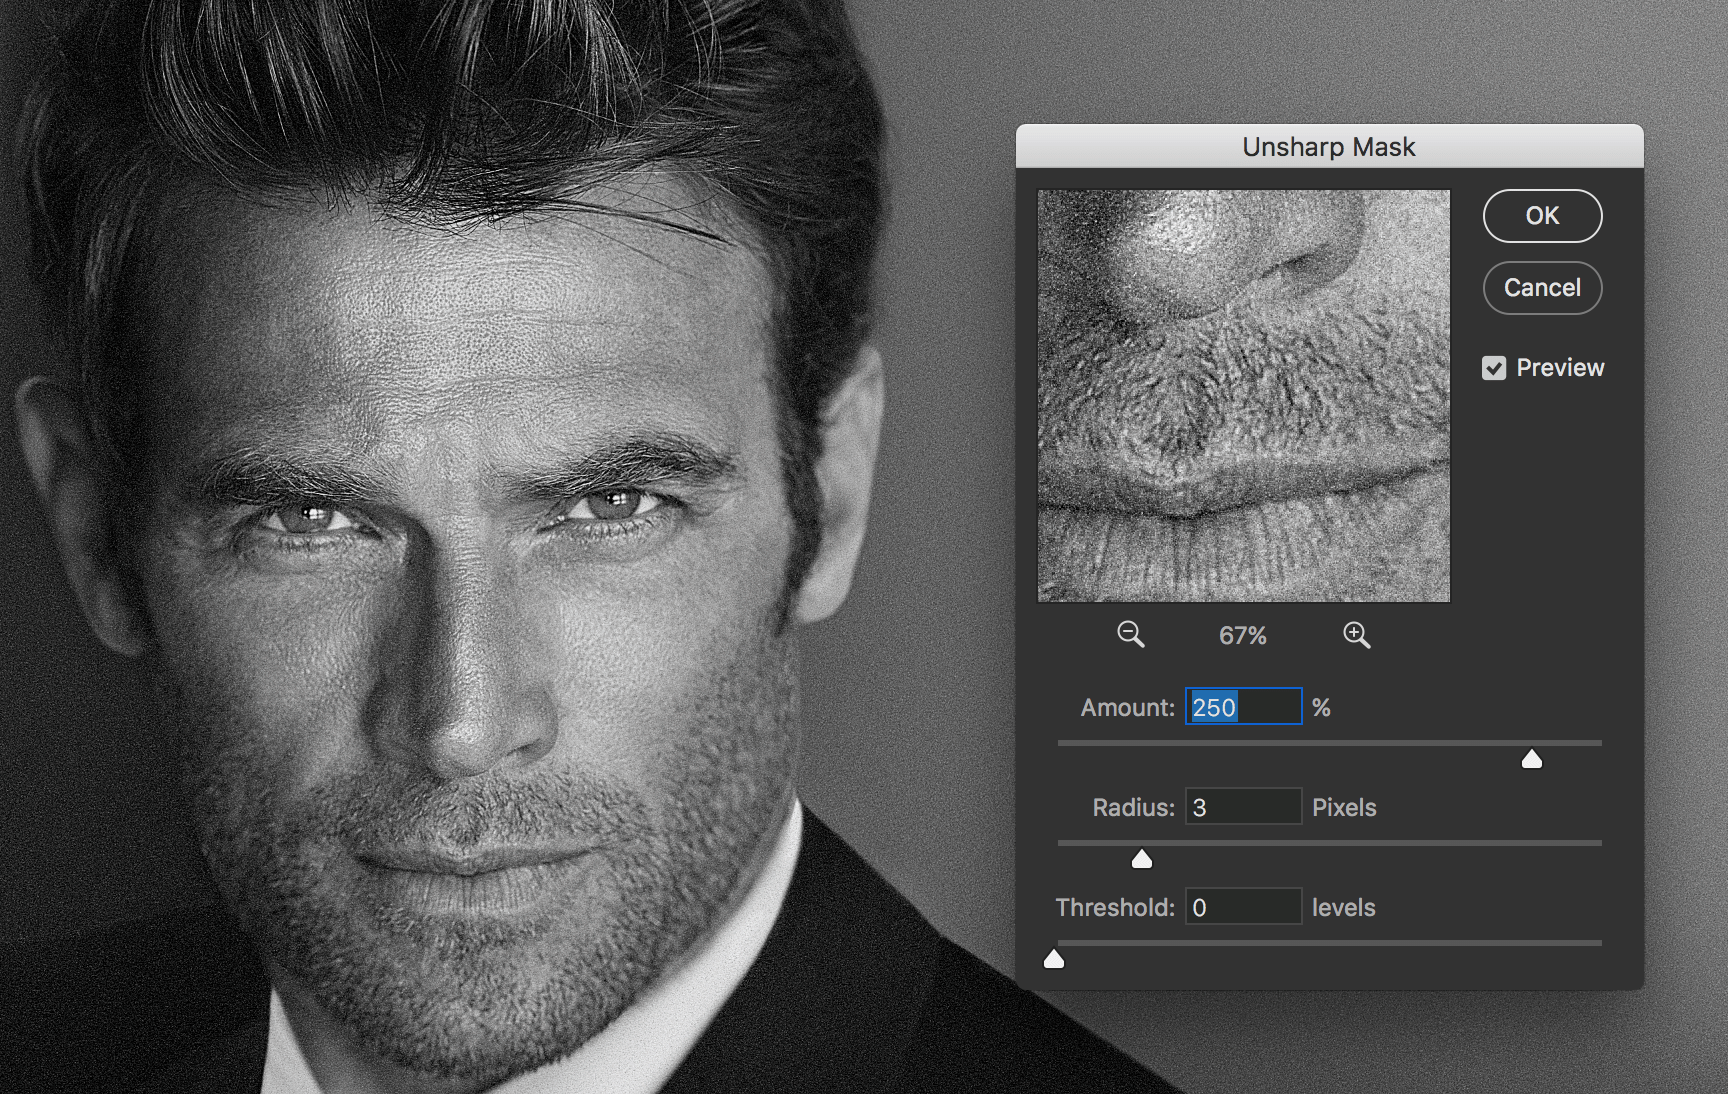
In Photoshop, the control panel for USM looks like this.

Unsharp mask control panel
There are sliders for Amount, Radius and Threshold.
The Amount slider dictates how much ‘edges’ are increased in contrast. If the value in this slider is too high, the image will appear to have ‘halos’ around the edges. A general rule of thumb is to start at 100%. For images printing on uncoated stock, this can be bumped to 200% or more. But, you need to set the Amount value so that the image actually looks over-sharpened on your screen. This is because the process of halftoning the image for print decreases the apparent sharpness of the image.
The Radius slider determines how wide the area of enhanced contrast is around edges. In general, the amount you put in the Radius field depends on the resolution of the image. For a 150# screen (300dpi) image printed on coated paper, I use 1.5 to 2.0 pixels. But for an image going on uncoated paper this can be increased to 2.5 to 3.0 pixels.
The Threshold command determines how far apart two neighbouring pixels must be in tonal value in order to be sharpened. I usually start with a Threshold of 3, but for images printing on uncoated stock, this can be set as low as 0.
Unsharp mask threshold adjusted
Every image will be different — you will need to tweak these settings so that the edge contrast is just starting to look acceptable — AND THEN PUSH IT FURTHER. This is the key point for images printing on uncoated paper. The amount of sharpening that you see on screen needs to be far greater than you initially think. Unfortunately only trial and error will give you the experience to know just how far to push it.
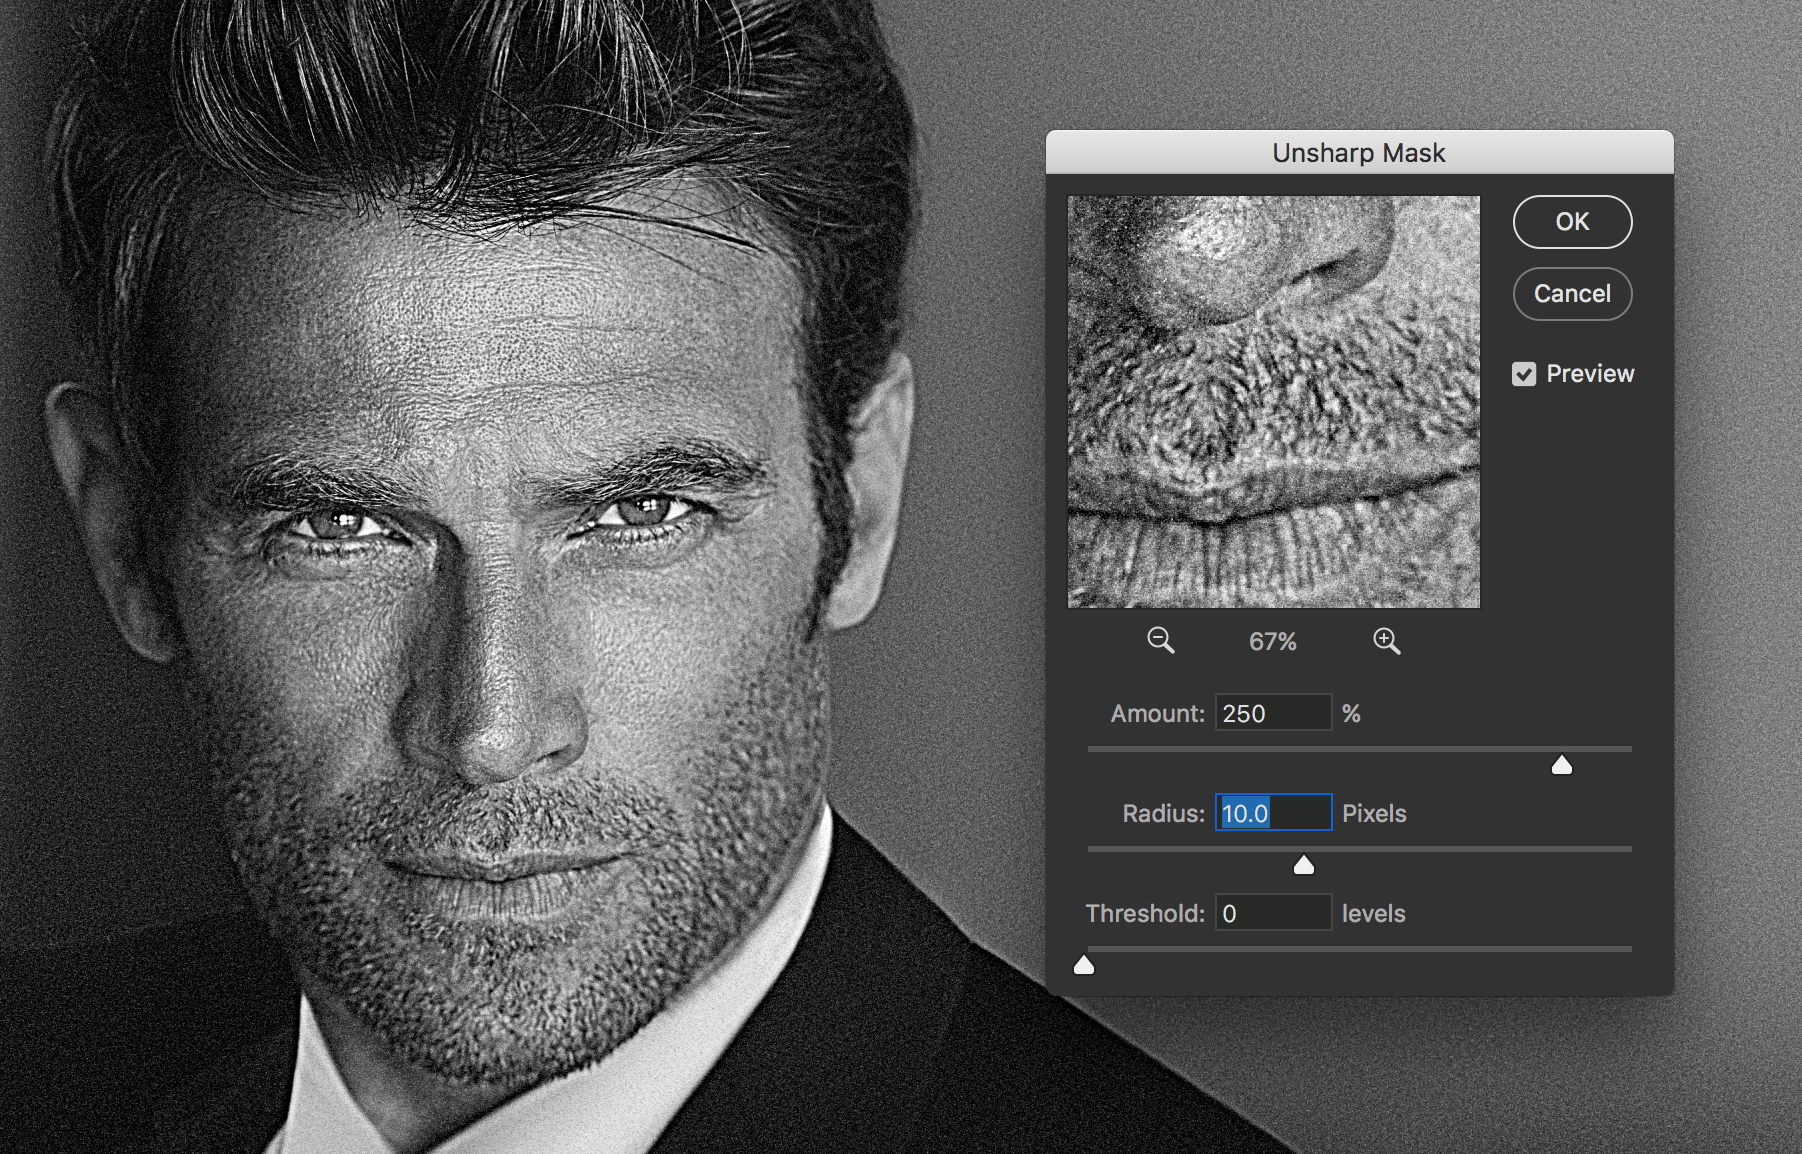
Even more unsharp mask applied
It is usually fairly easy to judge if you have taken the output sharpening too far. Halos become very obvious around all the dark edges, and the image looks overly contrasty. Nevertheless, even an image that looks unacceptable on screen is likely to look good when printed, especially on coarse, uncoated stocks such as newspaper, where screen rulings as low as 80# are still used.
Don’t be afraid of USM. Yes, it is the crudest sharpening method available. But it is the most effective and fastest way to make your photos look good when printed on uncoated paper.
Volumes of information and hundreds of articles have been written on the dos and don’ts of sharpening. Some good links include: